This will show you have to make a basic stretchy IK limb, with attributes to control whether it stretches automatically, and two to control the upper and lower stretch manually. Although this is a basic tutorial I assume you know how to do things like add attributes, parent nodes, create nodes, make connections, etc… I also don’t bother to name things here (bad me!). Most things here are typically be done in the Node Graph, Attribute Editor, and Script Editor. There are also various ways to do this type of setup, so feel free to experiment with other nodes.
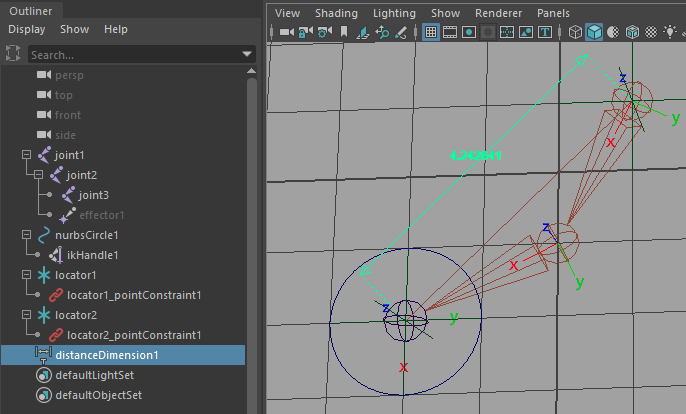
Create 3 bones to make an Arm, the shoulder and elbow should point down the chain in X, the wrist does not matter for this example. Create an IK handle from the shoulder to the wrist. Create a circle, snap it to the ik handle, then parent the ik handle so you have a control.
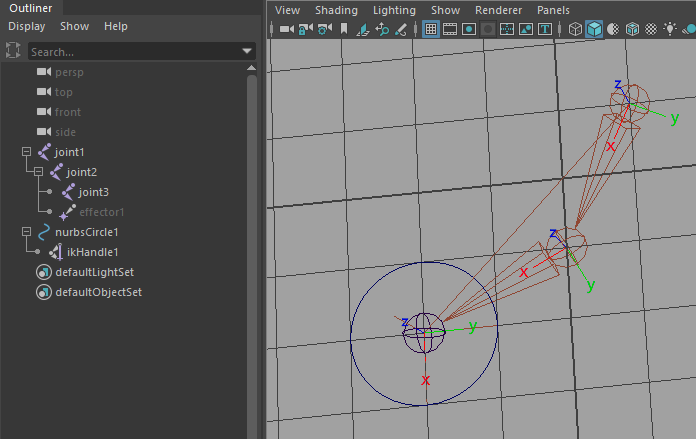
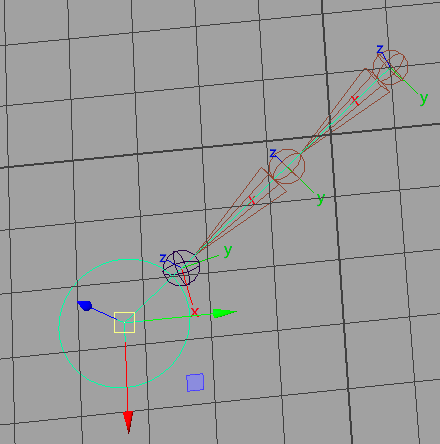
Now the fun part. IK handles allow you to translate along the bone (X) and will still try to hit your end point. Adjust the translate X of the wrist and/or elbow and see the change (undo once you are done translating). With this we can do two cool things, allow the limbs to stretch when the ik moves to far, and give the animator control of the upper and lower limb length.
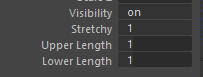
Now, add 3 attributes to the Circle, “stretchy” float from 0 to 1 and default to 1, “upper_length” and “lower_length” float from .01 to 5 and default to 1. These 3 attributes will control this behavior.
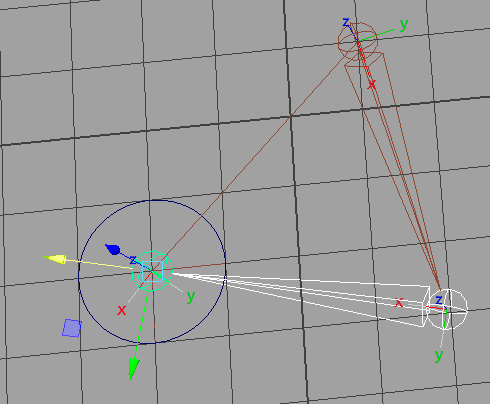
So lets setup the “stretchy”, notice that when you move the circle further then the limb can reach it just points at your circle, also called hyper-extension. When this happens your arm is perfectly straight, so if you wanted the wrist to land where your circle was moved, it is just a straight line from the shoulder to the circle. So you just need to calculate how much to modify the translate X of the elbow and wrist so the wrist will land on the circle. (undo if you translated to see the hyper-extension)
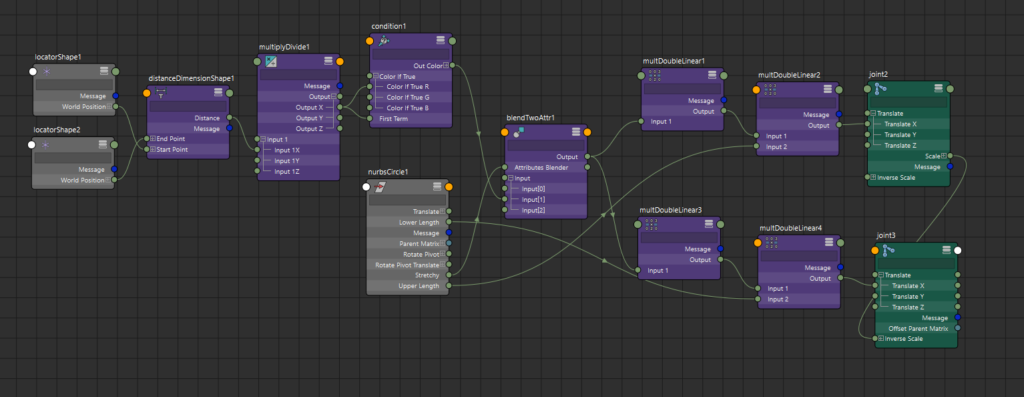
So now we need two distances, the length from the shoulder to the circle, and the starting length of arm. We will use these lengths to calculate a multiplier for the translateX of the elbow and wrist.
The shoulder to circle length can be calculated a few ways, eg a “distanceBetween” node, but the Create – Measure Tools – Distance Tool is visual so I will use it here. Run the Distance Tool and create two locators away from your skeleton/circle. Now point constrain the first locator to the shoulder, and the second to the Circle (not the wrist).
The starting arm length is just the translateX of the elbow and wrist added together, however, the channelbox decimal point precision is typically too low so you can’t just copy from there. So open the Script Editor, go to a Python Tab, and follow the steps below.
# select the elbow joint and run this, then select the wrist joint and it run again, you should get two long numbers like 2.23606797749979
cmds.getAttr('.translateX')
Take the two translate X values and paste them into notepad, add them up and paste that into notepad, keep them handy until the end. Ultimately we are going to connect to these attributes, so you will need the original values.
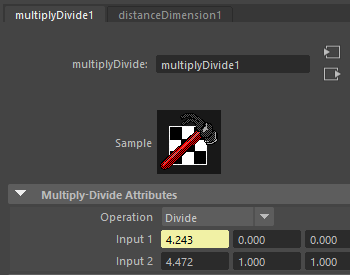
To calculate the ratio/multiplier for the translateX values, we just need to divide the length from the shoulder to circle by the starting arm length. Lets create a “multiplyDivide” node, and then go to the Attribute Editor and set it’s operation to ‘Divide’, and paste in the added value to the input2X. Finally connect the distanceDimensionShape1.distance to the multiplyDivide1.input1X.
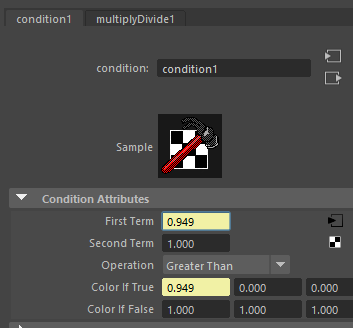
The outputX of the multiplyDivide will be our multiplier for the translateX values, however we only want to use this when it is greater than 1 and when stretchy is on, otherwise the arm would shrink as the circle got closer to the shoulder.
First, create a “condition” node, we will use this only output values 1 and over. Connect the multiplyDivide1.outputX to the condition1.firstTerm and to the condition1.colorIfTrueR. Then set the Second Term to 1, and the Operation to Greater Than. Now the condition’s outColorR attribute will only use the colorIfTrue value if your distance is greater than the starting arm length, otherwise it will use 1 (the colorIfFalse value).
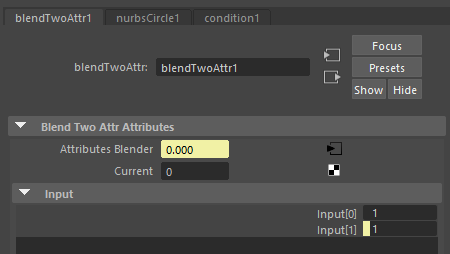
Now we need to setup the “stretchy” attribute so that it can dial from 1 to 0, where 0 means there is no stretch happens automatically. Create a “blendTwoAttr” node for this, which allows you to blend between two values using a 3rd value (stretchy). Connect the “stretchy” attribute to the blendTwoAttr1.attributesBlender, then connect the condition1.outColorR to the blendTwoAttr1.input[1]. To setup input[0] (the value when the blender is off), the easiest way (since maya is dumb) is to select the blendTwoAttr1 and run cmds.setAttr(‘.input[0]’, 1) in the script editor.
Now that we have the multiplier, we just need to use it! Create a “multDoubleLinear” node and connect the blendTwoAttr1.output to the multDoubleLinear1.input1. Copy the elbow’s translationX value (not the added value) and paste it into the multDoubleLinear1.input2, now the output value will represent the new multiplied value. However, remember the “upper_length” attribute? We need to get this working too, so create another “multDoubleLinear” node and connect the multDoubleLinear1.output to the multDoubleLinear2.input1. Now connect the “upper_length” attribute to multDoubleLinear2.input2. Finally, connect the multDoubleLinear2.output to the elbow.translateX. Repeat this process for the wrist.
Now all 3 attributes should function for your basic stretchy limb! Here is an example file of the setup.
What Else?
One quirk with this setup is how the “upper_length” and “lower_length” attributes work, their value is multiplied with the stretch factor from the blendTwoAttr, which can be a bit weird if they were using the upper/lower and then turned on stretchy. An alternative is to have these values default to 0 and add to the stretch value instead of multiply it.
You could also setup these attributes so they do not apply so fast when middle mouse dragged. Typically this means your stretchy/upper/lower attribute the animator’s use is 10x greater then the value you send to the rest of the nodes. Simply make a multDoubleLinear that multiplies the attribute value by .1 before sending it off.
You could also experiment with other options like squash and stretch, which typically uses the stretch factor to drive the scaleY/scaleZ for a cool effect for more cartoony characters. If you try this out, you should also have an attribute to fade it off like we do with the “stretchy” attribute. Good luck!